


Introduction
In the realm of home cooking, few ingredients command the same admiration as chicken. Its versatility allows it to adapt to a myriad of flavors and techniques, making it a staple in kitchens around the world. Among the myriad of chicken recipes, one stands out for its irresistible blend of textures and tastes: Crispy Hot Honey Feta Chicken. This dish marries the crispy crunch of perfectly baked chicken thighs with the creamy tang of feta cheese and the sweet heat of hot honey, creating a culinary experience that tantalizes the taste buds.
The appeal of this recipe lies not only in its standout flavor profile but also in its ease of preparation. Crispy Hot Honey Feta Chicken is an ideal choice for weeknight dinners, special occasions, or meal prep. Every bite offers a delightful contrast: the savory, juicy chicken enveloped in a crunchy breadcrumb coating, complemented by the richness of feta and a drizzle of hot honey that adds a kick of heat. As food enthusiasts increasingly seek recipes that deliver both convenience and mouthwatering flavors, this dish has become a must-try in many households.
Understanding the Ingredients
To create the ultimate Crispy Hot Honey Feta Chicken, it’s essential to understand the roles of each ingredient involved. This recipe primarily features boneless, skinless chicken thighs, Greek yogurt, feta cheese, hot honey, and breadcrumbs. Each component plays a crucial role in developing the dish’s distinctive flavor and texture.
* Boneless, Skinless Chicken Thighs: Choosing chicken thighs over chicken breasts is a game-changer for this recipe. Thighs are inherently juicier and more flavorful, making them ideal for baking. Their higher fat content ensures that the chicken remains tender and succulent even after cooking, providing a satisfying bite that contrasts beautifully with the crunchy exterior.
* Greek Yogurt: This ingredient is vital for marinating the chicken. Greek yogurt not only adds a creamy texture but also creates a flavorful base that tenderizes the meat. The lactic acid in yogurt breaks down protein fibers, resulting in a more tender chicken. Additionally, it acts as an excellent carrier for the spices and flavors, ensuring that every bite is infused with taste.
* Feta Cheese: Adding feta cheese to this recipe introduces a creamy, salty contrast that elevates the dish. The tanginess of feta complements the sweet and spicy elements while enhancing the overall flavor profile. Whether crumbled or sliced, feta cheese brings a Mediterranean flair to the dish, making it a standout choice for those who appreciate bold flavors.
* Hot Honey: The star of this recipe, hot honey, is a delightful blend of sweetness and heat. This unique ingredient is made by infusing honey with chili peppers or spices, resulting in a condiment that adds depth to the dish. The sweetness of honey balances the savory flavors of the chicken and feta, while the heat provides an exciting kick that keeps you coming back for more.
* Breadcrumbs: For achieving that coveted crispy texture, breadcrumbs are essential. They create a satisfying crunch that contrasts beautifully with the tender chicken and creamy feta. Using seasoned breadcrumbs can enhance the flavor further, while panko breadcrumbs offer an extra level of crispiness due to their larger size and airy texture.
* Ingredient Substitutions and Variations: Cooking is all about creativity, and this recipe is no exception. If you’re unable to find feta cheese, consider using goat cheese or ricotta as alternatives, each offering a unique taste profile. For those who prefer milder flavors, a sprinkle of mozzarella can work well, providing a good melt without overpowering the dish.
Hot honey can also be substituted with a combination of regular honey and a dash of cayenne pepper or chili flakes if you’re looking for a more customizable level of spice. Additionally, for gluten-free diners, gluten-free breadcrumbs and flour can be used without compromising the dish’s integrity, allowing everyone to enjoy this flavor-packed meal.
The Marination Process
Marinating the chicken is a crucial step in this recipe, as it enhances both flavor and tenderness. The process involves soaking the chicken thighs in a seasoned mixture that infuses the meat with taste before cooking.
* Creating the Marinade: To prepare the marinade, start with a generous amount of Greek yogurt, which serves as the base. Add minced garlic, onion powder, smoked paprika, salt, and pepper to the yogurt. The garlic and onion powders provide depth, while the smoked paprika introduces a subtle smokiness that enhances the overall flavor.
* Step-by-step Guide:
1. In a large bowl, combine 1 cup of Greek yogurt with 2 teaspoons of garlic powder, 1 teaspoon of onion powder, and 1 teaspoon of smoked paprika.
2. Season the mixture with salt and black pepper to taste—about 1 teaspoon of each should suffice.
3. Mix until well combined. The marinade should be smooth and creamy.
4. Add the boneless, skinless chicken thighs to the bowl, ensuring each piece is thoroughly coated in the marinade.
* Perfect Marination Time: For the best results, cover the bowl with plastic wrap and refrigerate the marinated chicken for at least 30 minutes, but ideally for 2-4 hours. This allows the flavors to penetrate the chicken fully and ensures a juicy, flavorful dish. For those pressed for time, even a 30-minute soak can make a difference, but longer marination will yield more pronounced flavors.
Preparing the Baking Station
An organized workspace is crucial for a smooth cooking experience, especially when preparing Crispy Hot Honey Feta Chicken. Here’s how to set yourself up for success:
* Correct Oven Temperature: Preheat your oven to 425°F (220°C). This high temperature is essential for achieving a crispy exterior while keeping the chicken moist and tender inside.
* Baking Sheet Preparation: Line a large baking sheet with parchment paper or a silicone baking mat. This not only prevents the chicken from sticking but also makes for easy cleanup. If you have a wire rack, place it on top of the baking sheet to allow air circulation around the chicken, ensuring even cooking and crispiness.
* Creating a Dipping Station: To efficiently coat the marinated chicken, set up a dipping station. You’ll need three shallow dishes:
1. One for the flour, seasoned with salt and pepper.
2. The second for the beaten eggs, which will help the breadcrumbs adhere to the chicken.
3. The third for the breadcrumbs mixed with a bit of seasoning to enhance flavor.
Arranging these components in order will streamline the coating process, allowing you to coat the chicken quickly and efficiently.
Coating the Chicken
Now that your chicken is marinated and your workstation is prepared, it’s time to coat the chicken thighs for that crispy finish.
* Coating Instructions:
1. Start by removing the marinated chicken thighs from the refrigerator. Let them sit at room temperature for about 10 minutes to ensure even cooking.
2. Take one chicken thigh and dredge it in the seasoned flour, shaking off any excess. This initial coating helps the egg wash adhere better.
3. Next, dip the floured chicken into the beaten eggs, ensuring it is fully coated. The egg acts as a glue for the breadcrumbs, creating that signature crispy layer.
4. Finally, press the chicken thigh into the breadcrumb mixture, ensuring an even coating on all sides. For extra crunch, consider double-dipping by repeating the egg and breadcrumb steps.
* Techniques for Adhering the Coating: To ensure the coating sticks well, press the breadcrumbs firmly against the chicken. This will help create a thick, crunchy layer once baked. Additionally, avoid overcrowding the baking sheet; give each piece space to breathe, which promotes even browning.
With the chicken thoroughly coated, it’s now ready for the oven, where it will transform into a crispy, flavorful delight. Throughout this process, remember to maintain a clean workspace and follow food safety guidelines, particularly when handling raw chicken. This meticulous approach will ensure that your Crispy Hot Honey Feta Chicken turns out perfectly every time.
As you prepare to bake, anticipate the aromatic blend of spices, cheese, and honey that will soon fill your kitchen, setting the stage for a truly delightful dining experience.
Explanation of the Three-Step Coating Process
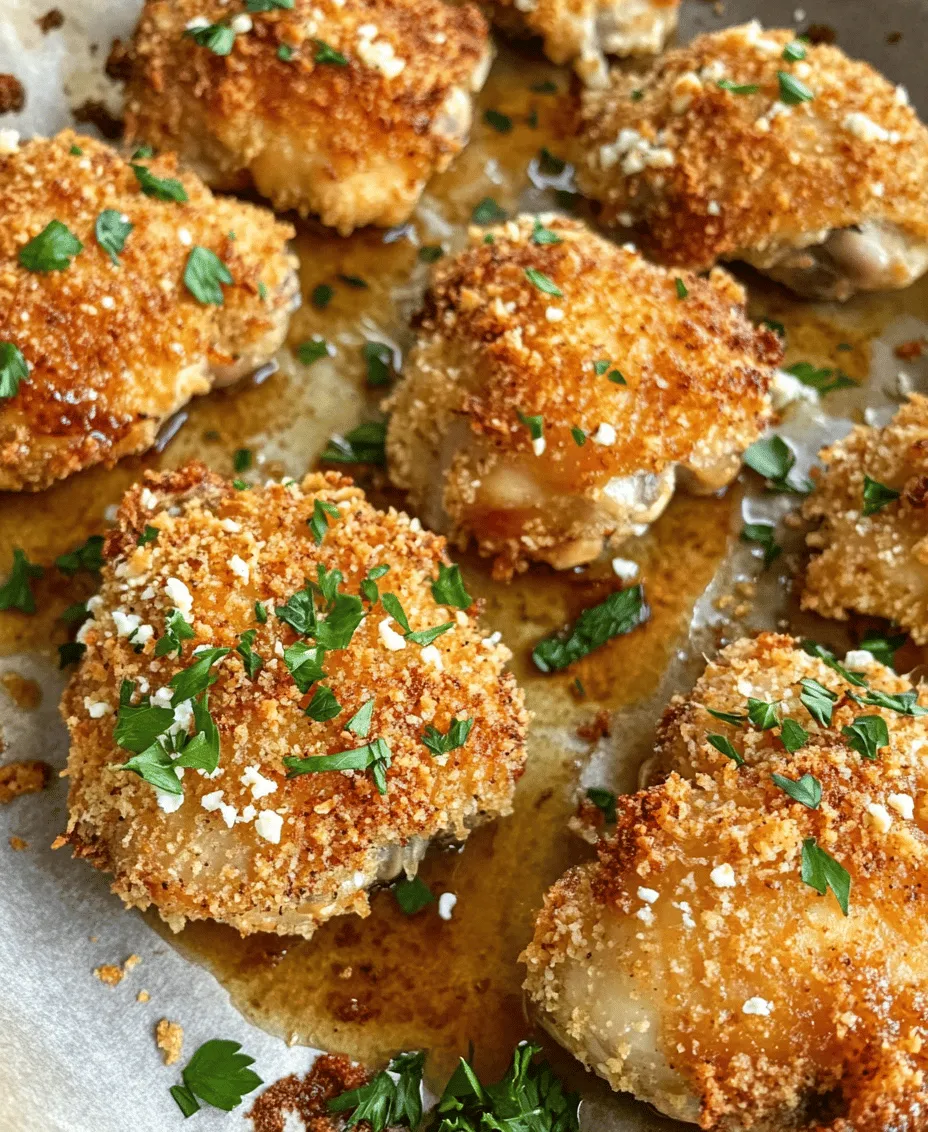
The crispy hot honey feta chicken is all about achieving that irresistible crunch and flavor through a meticulous three-step coating process. The steps include coating the chicken in flour, dipping it in egg, and then rolling it in a breadcrumb and feta mixture. Here’s a breakdown of each step:
1. Flour Coating: Start by lightly dredging your chicken pieces in all-purpose flour. This initial coating helps absorb moisture from the chicken, ensuring the egg adheres properly. It also creates a barrier that locks in the chicken’s juiciness.
2. Egg Dip: After the flour, dip each piece of chicken into a beaten egg mixture. This step is crucial as it acts like glue for the next layer, allowing the breadcrumbs and feta to stick effectively. Make sure to let any excess egg drip back into the bowl to avoid a soggy coating.
3. Breadcrumb and Feta Mixture: For the final layer, combine seasoned breadcrumbs with crumbled feta cheese for added flavor. Gently press each chicken piece into the mixture, ensuring an even coating. The combination of breadcrumbs and feta delivers a rich, salty flavor and a satisfying crunch once baked.
Tips for Achieving Maximum Crispiness
– Use Panko Breadcrumbs: For an extra crispy texture, opt for panko breadcrumbs instead of regular breadcrumbs. Panko is lighter and airier, which helps create a crunchier coating.
– Double-Dip for Extra Crunch: If you want an even thicker and crunchier crust, consider a double-dipping technique. After the first coating of breadcrumbs and feta, dip the chicken back into the egg and then again into the breadcrumb mixture.
– Let It Rest: After coating, allow the chicken to rest on a wire rack for about 15-20 minutes. This resting period helps the coating adhere better during baking and enhances crispiness.
Baking to Perfection
Achieving the perfect bake is essential for a delicious crispy hot honey feta chicken. Here are some essential tips for monitoring cooking times and doneness:
– Oven Temperature: Preheat your oven to 400°F (200°C). A higher temperature promotes crispiness, ensuring the coating becomes golden-brown while the chicken cooks through.
– Cooking Times: Bake the chicken for 25-30 minutes. The exact time may vary based on the thickness of your chicken pieces, so it’s crucial to keep an eye on them.
Signs That the Chicken is Ready
– Visual Indicators: Look for a golden-brown color on the crust. This hue indicates the coating is crispy and the chicken is likely cooked through.
– Internal Temperature: The safest way to determine doneness is to use a meat thermometer. Insert it into the thickest part of the chicken; it should read at least 165°F (74°C) for safe consumption.
Creating the Hot Honey Sauce
Now that your chicken is baked to perfection, it’s time to prepare the hot honey sauce that gives this dish its signature sweetness and spiciness. Here’s a step-by-step guide:
1. Ingredients: Gather 1/2 cup of honey, 1-2 tablespoons of red pepper flakes (adjust based on your heat preference), and a pinch of salt.
2. Combine Ingredients: In a small saucepan over low heat, combine the honey and red pepper flakes. Stir the mixture gently, allowing the flavors to meld for about 5 minutes.
3. Flavor Adjustments: Taste the sauce and adjust the heat by adding more red pepper flakes if desired. You can also add a squeeze of lemon juice for a tangy twist or a dash of soy sauce for an umami boost.
4. Enhancing Flavor with Salt: Adding a pinch of salt to the sauce enhances the overall flavor profile, balancing the sweetness of the honey with a savory kick.
Serving Suggestions
Pairing your crispy hot honey feta chicken with complementary side dishes not only elevates the meal but also enhances the dining experience. Here are a few suggestions:
– Fresh Cucumber Salad: A refreshing cucumber salad pairs wonderfully with the savory chicken. Combine sliced cucumbers, diced tomatoes, red onion, and a simple dressing of olive oil, vinegar, salt, and pepper. Toss in fresh herbs like dill or mint for an aromatic touch.
– Roasted Vegetables: Roasted vegetables like bell peppers, zucchini, and carrots make a vibrant addition to your plate. Toss them in olive oil, salt, and pepper, and roast them in the oven during the last 20 minutes of the chicken’s cooking time for a harmonious meal.
– Presentation Tips: To create a restaurant-style meal at home, plate the chicken beautifully by arranging the sides artistically. Garnish with fresh herbs, such as parsley or basil, for an extra pop of color and flavor.
Nutritional Value and Health Benefits
Understanding the nutritional content of your meal is essential for mindful eating. Here’s a quick analysis of the health aspects of crispy hot honey feta chicken:
– High-Protein Benefits: Chicken is an excellent source of protein, which is essential for muscle repair and overall health. Pairing it with Greek yogurt in the sauce or as a side adds even more protein.
– Moderate Honey Use: The honey in this recipe serves not only as a sweetener but also provides antioxidants. Using moderate amounts allows you to enjoy the dish without compromising on health.
– Mindful Indulgence: While this dish is indulgent, it can fit into a balanced diet. Enjoy it alongside nutrient-dense sides like salads or roasted vegetables to create a wholesome meal.
The Cultural Significance of Chicken Dishes
Chicken dishes hold a significant place in various cultures around the world. They showcase how a simple ingredient can be transformed into countless delightful recipes. The crispy hot honey feta chicken is a perfect example of modern culinary adaptation, merging traditional flavors with contemporary techniques.
– Universal Appeal: Chicken is a staple protein in many diets, making it a versatile choice for home cooks. This recipe captures the hearts of both traditionalists and those seeking new flavor experiences.
– Fusion Foods: The growing trend of fusion cuisine highlights the power of blending sweet and savory. The combination of honey and feta exemplifies how culinary boundaries can be crossed to create something unique that tantalizes the palate.
Conclusion
Crispy hot honey feta chicken is not just a dish; it’s an experience that brings satisfaction and joy to your dining table. The meticulous coating process, combined with the delightful hot honey sauce, creates a meal that is both delicious and memorable.
Encouraging you to try this recipe at home allows you to embrace the joy of cooking and the satisfaction of creating a flavorful dish from scratch. Whether enjoyed on a casual weeknight or served at a gathering, this recipe is sure to impress and leave your guests craving more. Enjoy the process, relish each bite, and appreciate the art of a well-cooked meal.
